Sarafina Fiber Art

Sarafina Fiber Art

Thursday, December 1, 2016

2D or Not 2D Needle felting Challenge with Lleona Chew


In the Spring of 2016, Sarafina hosted a needle felting challenge for our Facebook group members called 2D or Not 2D.  We asked participants to needle felt a 3D and 2D project.  Entries were judged on creativity, use of fiber, relation of the 2D and 3D pieces to each other, as well as written description and photographs. Lleona Chew was the Challenge winner and the following details her felted creations:

Completed 2D


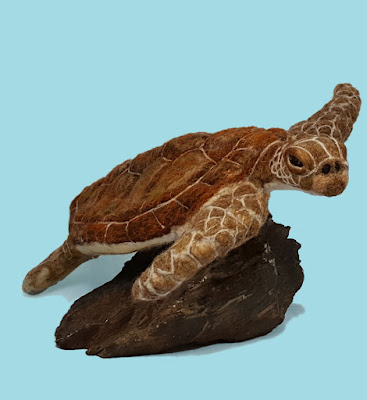
Lleona's Finished 3D Sculpture


When I first saw the 2d competition posted on the Sarafina fan page, I thought to myself, “No thank you, I'll stick to making my 3D critters!” The idea of filling all of that empty space on a wool canvas was just too intimidating. A serendipitous trip to the Art House ended up changing my mind. Nestled in with the rainbow of wool roving was a luscious, just begging-to-be-felted Ocean Landscape Batt. I picked it up and ran my fingers over the perfectly blended shades of blues and white, and knew that I had to find some way to use it.  I wandered the treasure trove of wool in the Art House, holding the batt up to the various shades on display, until a gorgeous red brown Copper Core Wool brought back a memory of holding young sea turtles at a rescue in the Caribbean. I was caught in the beauty of the wool, and ready to go!

Once home, the sight of that blank prefelt almost scared me away again. This time my mess of a work table provided an extra boost of inspiration. A gift from the fiber fairy of colorful locks sat next to my new purchases, and I noticed how much the green shades looked like waving plants-the perfect snack for the sea turtle taking shape in my mind. From there, it was surprisingly easy to bring the image to life. The Ocean Batt did all of the heavy lifting for the background; if I wanted to lighten or darken an area I just pulled from a different area of the batt and watched the magic happen. The green locks seemed to find their own spot on the canvas, twisting and bending on the ocean floor in organic patterns with every poke. Even the turtle itself seemed eager to be felted. I lined up the various shades of brown core wool from the Sarafina Browns Core Sampler, along with the Copper Core Wool, and picked at will to create the shell and skin tones. I used some of the wisps left over from the green locks of the sea bed to add some mossy accents to the shell. A bit of gold for the eye, and my first completed needle felted painting was staring back at me. I was thrilled!


For the 3D portion of the challenge I was in more familiar territory. Having all of the shades of brown from the sample pack truly made blending the shell easy. The 2d picture made a great reference for the sculpture, and I moved across the shell happily pulling bits of browns and greens to add dimension and depth. The geometrical lines of the shell were fairly straight forward but the limbs were a bit more challenging.I didn't want too rigid of a pattern but was having problems getting the wool lines to look random enough. I finally resorted to sketching on the wool with a bit of chalk and then adding wool on top-problem solved! From there it was just a matter of patiently adding the many lines and highlights that really add a touch of realism.


This was a fantastic challenge that really pushed me to experiment with new ways of using wool in my art. I found the 2D process to be easier than I had imagined, largely thanks to having the right fibers and textures on hand to really make the project come alive. The biggest challenge was in figuring out the direction of the light and the angles of the body. I think in the 2D picture I exaggerated the head too much because I wanted it to seem like he was swimming towards the viewer. I also had trouble creating depth in the water behind the turtle, although having the Ocean Batt helped out a lot. The biggest challenge of the3D process is that it takes so much longer; I stopped counting after about 15 hours. Photographing 3D work is more complicated as well, from getting the light to fall equally across the piece in my tiny setup to finding natural poses. I enjoyed both dimensions, and I am really glad to have participated in the challenge. Thanks Sara for pushing us to explore new areas in such a fun way!

You can see more of Lleona's work on Etsy at Aniclay Art and coming soon, Aniclayart.com.

Thank you, Lleona, and all who participated in the 2D or Not 2D Challenge.  We had an amazing array of submissions, every one of them heart felt and a joy to receive. 

Wednesday, November 18, 2015

We Need a Tree Skirt

Setting up shop for a show or event is one of my favorite things to do, especially around Christmas.   Bringing out trees, lights, shiny anything, and ornaments erases away the cold and dark and rushes in the warm and cozy.

This year as we prepared for our open house, I realized that we had no tree skirt so I added it to my shopping list.  The base of the tree needs to be cozy too.  Suddenly I realized that I could make one before I would have time to go shopping; handmade is better anyway, and I am impatient, so to work I went!

I started with one full sheet of Dark Prefelt, since I was working with a dark top layer.  I folded it onto 1/4s and cut the edge rounded so that when opened it became a circle (more or less with me since I am an impatient non-perfectionist.)

I used our big carder to create a few large batts in the midnighty color I was going for.  At first it was too purple/witchy so I re-carded.carded with more gray and aqua.   I used almost two 4oz batts but in hindsight, it was a bit too much wool.  (4-6 oz total would probably be plenty to create two thin layers.   Fiber Art Batts, Landscape Batts, Pelts, and any Top Coat or Merino will work well.).  I was going for two layers of wool on top of the Prefelt.  I find batts easier on these large pieces because you can stretch out and arrange larger amounts at a time than pulling from thinner roving.

This is the Witchy Before.  I tried to arrange the batts somewhat crisscrossed and fanned around the edges.


I treated the edges with some locks that we had that were somewhat felted together.  I laid them over the prefelt a bit and under the edge of the top batts a bit so that they would wet felt into place.  Some other edge options would be carefully arranged long locks, cut into the desired shape after felting and trim with stitching or trim, natural felted edge, needle felted fluffed lock "furry" edge, etc.


The hardest part of this project was finding a big enough wet felting set up.  I used two pieces of our blue Pool Cover from our Wet Felting Kit with a supporting piece of Gortex underneath.  Anything that can get wet and help support the Pool Cover when you roll it up will work.  I had some large pieces of netting that my friend saved from a house she was cleaning out to use for the top (Yay to pack rats!).  I also used one full length pool noodle; you could find a broom handle, pvc pipe, or any long skinny household item. 


First I wet the whole thing down outside and gently made soapy circles with my hands to begin setting the wool.  You can feel it become less squishy under your hands after 5 minutes or so.

Then I rolled up the layers around the pool noodle and tied it off.  I then decided to work on a table.  I rolled 100 times from all four directions for a total of 400.

Next I rinsed hot and cold.  Back and forth several times, smooshing and banging it along the way, until all of the soap was out.


After the piece dried I began needle felting.  First I used a layer of White Top Coat to establish the basic shapes of my design.  Then I used Snow White Batt to cover the white and create the snowflakes (which by the way were a test of my commitment to the whole thing.)  I used about 2 oz of white and less than 1 oz of Snow White for this design.  I had to needle felt the lock edges in a few places.

Laying in the white shapes

At any point after felting and drying you can cut the slit and tree hole.  Fold into 1/4s again and cut of the center tip.  Start small, you can always cut more if it's not large enough.  Then decide where you want to slit to be - perhaps find a less perfect part of the skirt so it will be towards the back.


When all of the needle felting was done,  I ironed the entire skirt on high heat with steam to flatten and soften it.  Our tree was cozy and pretty outfitted with this Winter Night Tree Skirt.


Anything goes!  Any color, texture, design, even shape!  Needle felt, quilt, embroider, bead, trim, embellish your project anyway that you can.

I have ideas for a second and also stockings!

Wednesday, November 11, 2015

Why Buy Handmade: Because We Were Meant To


Purchasing a handmade item or piece of art is an intimate experience connecting people to people and people to Earth.  Long ago, the needs of people were met by what the Earth provided.  I need a bed – gather leaves.  I need food - gather nuts and berries.  I need medicine – gather herbs.   Then people traded and sold items that they made and perhaps in which they had a specialization. I need my wheat ground – go and trade with the Millers. I need my horse shod  – go and see the Smiths.  Spanning time and cultures, humans also saw beauty in the world and replicated it in adornment and creations that existed for the sole purpose of being admired, not to be used at all - art. Whether born out of necessity or just for the beauty, handmade is our history.  

In the modern world we have become distanced from our purchases.  Materials are far removed from their source, in distance and in processing, and the buyer is far removed from the creator.  Technology and engineering have streamlined creation to make millions of the same thing.  Don't get me wrong, I prefer a mattress to leaves and I would be up shit creek without Imodium, but I want explain why I seek out a world created by hands.

I am not interested in drawing a line between craft and art so I will just be referring to the entire spectrum as “handmade” or “creation.”   A handmade item has been inspired.  Inspiration can come from need, color, a feeling, a moment, a technique, nature, a memory, a medium, a discovery, and the list goes on and on for eternity. 

The creator uses his/her skill and chosen medium to take the inspiration and create an object. He or she is thinking about why that particular color, texture, or material will work just right, and making thousands of tiny decisions that shape the creation into something that only that one person could make and could probably only make one time – never again the same.

The buyer/admirer is attracted to the handmade item.  The buyer sees in the item something that speaks to him/her.  It says, “I am your favorite color (texture, shape, subject, etc)  and you are intrigued by the decisions that were made to create me. You see in me a reflection of yourself!” 

Therefore, the buyer is connecting not only to the item but also to the creator.  They have now shared the experience of the creation.  The buyer can further connect by giving the creation as a gift.  Now the recipient of the handmade item can admire the creation, love the giver, and connect with the creator.  I mean really, how much more connecting can you get?  Well, there is more….

... all involved, creator, buyer/admirer, and recipient are experiencing a connection to the Earth’s beauty, inspiration, and materials.   We have no handmade without materials.  We have no inspiration without experiencing our world.  We have no beauty without the sight of our Earth.

My shop is currently full of creations born from the Earth's gifts; wood, fiber, clay, leather, stones, metal, gourds, and more.  Shaped by creators and ready to be admired, possibly purchased, possibly given, but definitely appreciated.

It's hard to pick a favorite  (No it's not, I have started a small pile.), but one is a live edge dark walnut serving board harvested locally and made with care by a long-time friend. It is so simple, a single piece of wood.  But it celebrates the beauty that occurs without fuss.  A reflection of me?  Not me exactly, but what I love most in this world. 


Shop handmade this year.  Shop local.  Shop small business.  Create your world.

Thursday, October 29, 2015

Fiber Art Bundles: What CAN'T you do with a F.A.B.?

I spent three years as a line cook in a restaurant kitchen.  Cooking with the big equipment and kitchen power tools, a walk-in filled with fresh meat and produce, and shelves lined with every spice and seasoning you can imagine, all right at your finger tips, lead to some innovative, elaborate, and inspired dishes. (Cooking at my house is not nearly that kind of adventure. Who has saffron or a robocoup?) 

The Art House provides a similar environment with a focus on  fiber.  No idea goes unexplored and we have, or can get, the fiber to see it through.  It's a professional fiber kitchen!  And from such a place comes mouth watering delights.  One of those is Fiber Art Bundles:  dyed lots of a mix of top shelf fibers like Mulberry Silk, Mohair, Wensleydale, lamb curls, and other soft locks.


What can you do with such a bundle?  

You can do anything fiber related, wet felt, nuno felt, 2D, needle felt, sculpt, and spin.  

This particular bundle started out as a mix of Mohair roving, Mulberry Silk, BFL/BL cross, Wendsleydale lamb, and BL curls.  I dyed it a muted mix of coppery browns to aqua and teal to gold.  The color palette said "winter woods" to me.  
Soaking before the dye bath
16 oz Dyed and ready for action - Winter Woods

First I carded the Mohair and Silk together into a crazy soft and lofty batt.  I wanted the batt for ease of laying out layers in 2D feltng,  for further mixing for 3D felting, and for creating fluff for spinning.  All to be used along with the dyed locks.


2D Snowshoe Hare: 

Let's start with the 2D.  After I carded the Mohair and Silk together, I further carded several other colors together with the snowshoe hare in mind.  Several shades of "grey" to white were made with the aqua and browns from the FAB and various amounts of white.  I used a 1/4 piece of Prefelt as my backing.

I laid in some lights and darks in top coat roving and merino


Then I began to lay in curls, the carded colors, and even some yarn to represent twigs and branches.  


After all was in place, I wet felted the whole piece.


After it dried I needle felted the hare using all the mixed colors that I made.  


Spun yarn:

I am not an experienced spinner.  At this point I enjoy it therapeutically and use it in my own creations or give it away.  So please try to imagine what someone, with abilities that I do not have, could do with these fibers.  

For this yarn I fluffed together all of the fiber; all of the locks and the batt of Mohair and Silk got pulled and teased into a big box of fiber fluff.   I spun from the fluff into a thickish single, overspun slightly so I could spin it back with a thin commercial gold yarn that I had on hand.  

12 Ounces


Needle Felted Old Man Winter: 

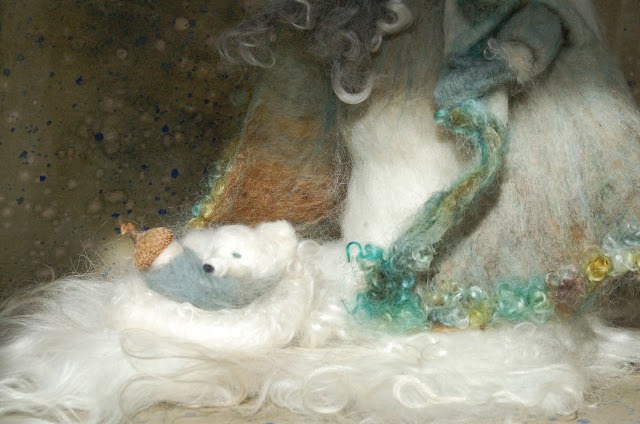
For my 3D project I used the remaining blends of various colors from the 2D Hare project.  I started with a Forest Folk style armature a la Lee Charlton.  He has a robe and cloak with opposite ombre coloring all trimmed with the locks from the FAB.  His cloak was wet felted as we did in the Cloak Tutorial.  He also has a wet felted Icelandic rug, a New Year Baby, and sleepy arctic fox inspired by Cheryl Tomline's sleepy felted animals.   

Old Man Winter


I love this color palette.
I Hope you will try one of our FABs and cook something special up in your fiber kitchen.


Sunday, September 27, 2015

Lonely no Longer

       A series of recent events have flooded me the realization that I am surrounded by great people in a creative community that did not even exist for me just 3 years ago. 


Four Day Workshop group with their owls
For a long time I worked odd jobs to support my art habit.  From retail, to waiting tables, to mucking stalls and galloping race horses, I did what came my way to keep my head above water (and sometimes I needed a little help when I slipped below the surface). Other than painting/creating, a career path did not call out to me.  So I painted when ever I could.  My marriage to Dave gave me a huge advantage with the security that came with it.  Before Max and Evan were born, I spent a year just painting! It was a wonderful year.

It was also the year of 2001.  On 9/11/2001 my career path was shaken by the absolute grounding emotions of humanity with the attack on our country.  Stripping life down to death, loss, and vulnerability made painting feel like an indulgent and selfish pursuit.  What was I really contributing?  Pretty paintings to relatively wealthy people who could afford them?  Of course it has its place, but at that moment in time it felt empty.

Life of course went on and the arrival of two babies definitely becomes all encompassing.  (The experience of a young family is its own blog!)  I did keep painting.  I would have gone nuts if I did not make time for it. 

But still, I wanted to be a part of something that extended beyond my own two hands.  I dabbled in the idea of a Cafe.  I had Dave on edge with the thought of the time, money, and risk involved in such a venture.  It fizzled when the same realization sunk into my brain, but still, I know it was a great idea and would have been a huge success.  ; )  I volunteered, briefly.  I considered teaching art somewhere.  But nothing stuck.

When needle felting came along, I had no idea where it would lead.  I just loved it.  At first I would paint in the mornings (my real job) and felt in the afternoon if I had time.  Then it morphed to felting in the mornings and painting if the afternoon if I had time.  Then felting became the only focus.  I was thrilled with the prospect for growth.  (Turns out, all of those odd jobs, gave me skills that I would need, and still use, to move forward as an entrepreneur. )

Pat and Bernie with Nunno Felted Scarves taught at The Art House by ReCreatively
The growing interest in the art and the demand for supplies drove me towards creating Sarafina.  Talbot actually worked for me first, when I was still in my home!   Moving out of my house was the first big step.  Then, while Talbot was off working some where else, Kyla joined me and soon after Jennifer. 

The Mill, about 500 square feet of rustic space only 1/10 mile from my home.

I will not lie, having two other personalities (in many ways opposite to my own to boot) in the space was an adjustment.  But adjust I did and the three of us began to make great things happen. 

A powerful trio

We moved again to our current location, another big step.  All the while we were growing our online community with Facebook, YouTube, and Etsy.  Now we have a legitimate local presence.  A place to invite people to share creativity with us. 

Grand Opening


Wet Felted Landscape Workshop - one of my favorites!
Friday was one of those perfect days in the shop.  Everyone was there; Kyla, Jennifer, Talbot, Marsha, Mary, and I.  Everyone was doing something remarkable that takes advantage of their skill set.  It was as if we were in a movie scene, the transformational montage with the cool music and no dialogue, all day.  I have my "beyond my own two hands."


The Sarafina Crew less Mary.  I will write a blog about each person, including Mary.


Thanks to social media I have also made new friends.  Dear friends as well as an extended creative community. 

A horrible picture depicting a wonderful time

A few of my faraway Besties thanks to Facebook.

Creativity does have its place in this world.  Even on the smallest level it gives us hope.  It gives us something where we once had nothing.  It is God's way of acknowledging our recognition of the beauty of  his/her creation.

Thank you for being a part of something greater than any one of us.  Make something today. : )

Add caption


Wednesday, September 16, 2015

What Didn’t Happen and What Isn’t There


Over a year ago a seed was planted; the idea to hold a workshop across the Atlantic in England.  It started with a few requests and then an invitation from a remarkable woman who wanted to see the seed grow as much as I did.  Over the year we planned and more and more people become involved and made significant obligations in time, money, and energy.  Teachers, hosts, staff, participants, and all of the families around them watered the seed until we all had a week full of fun in front of us with months of anticipation.  I fluttered with excitement fueled by what lay ahead.

But with one fatal murmur at the passport check at The UK  Border, the carefully cultivated, now mature plan was ripped out and in front of me left a huge ugly crater big enough to hold 100 rusted buses.  Where there once was the plan to share, felt, laugh, and bond with new friends, there was now only the gaping negative space.  How on earth could I cross this hole in front of me? 

At first the loss overwhelmed me.  Complete emptiness.   No ideas.  Just The Crater.   “Gutted” was the word of the moment.   But only hours later, there were new revelations emerging.  The Crater made space.  And the space allowed different experiences and opportunities.  Lee and I shared something dramatic and like the good friends that we are, it bound us tighter together.  Love poured in through the few texts we were allowed to receive and the dirty ancient phone attached to the wall in the holding room during our 9 hour detainment.  I felt the love even through the greasy receiver.  After our release, we had 6 hours of time to kill from 12 am to 6 am before our flight back home.  Our UK friends, Cheryl and Malachai, whom we had never met in person, drove over 2 hours each way in the dark and rain wee hours of the morning to spend some time with us in the cold, badly lit airport.  I can not express in writing how they warmed that time and space.   I will cherish that short time spent with them.  Kyla, Lee, and I began to plan how on earth we could make up the cancellation to the workshop participants.  I shuttered to think of it, but as it turns out, it is another opportunity.  Not only for my business to do what’s right, but also an unexpected gift back to us to feel the concern and support from the very people jilted. 

About 36 hours in for me 48 for Lee and 2 am.  Not a bad looking lot considering!

And now Lee and I are on the plane back home.  Lee will have a few open days to spend with me; again, we have been given an opportunity.  We have already plotted all of the things we can do.  The negative space is holding all of the new positive experiences and will continue to do so in ways I can’t even imagine yet.  Because of what did not happen, my life is richer in an alternate way.

And here lies a needle felting analogy!  The negative space, what is NOT there, enriches our sculptures.  Cherish the interest of negative space.   Allow it to be, creating dimension, shadows, peaks, and valleys.  Do not fill it.  See it nature and mimic in your work by leaving it empty.  It holds goodness.  I will elaborate more on that when I can hold my eyes open. 

We will land soon.  One more new experience in line for me thanks to The Crater:  the shower and nap of a lifetime. 


Thursday, June 11, 2015

Nothing is Black and White: Creating Color Life in Shadows and Highlights

My painting palette has no black.  While black is obviously very dark, I find it flat and lifeless.  The darkness we see is simply absence of light; so it still has some color in the depth of the objects.  Aside from being dark, it should be sheer, receding, and transparent.  Similarly, a white object is not shaded with grey.  The shadows are multicolored created by all of the surrounding colors and the type of light in the environment.  Also, highlights to black are not grey; they are teal, purple, rust, aqua, blue... anything but grey.

Avoid using black in your darkest darks, as well as to create gray shadows for white.  Whether you are painting with oils or wool, your work will more have life, dimension, and interest without it.

I like to create black in oils by mixing or layering transparent dark colors - Veridian Green, Alizarin Crimson,  and Ultramarine Blue.  You can slant your black in any of those color directions by adding more of one color, or by making it the top layer.  You can also lean toward brown by adding a touch of yellow.

A white shaggy dog on black (not really) back ground - All of his shading is variations of purple, green, and cream.

This turkey canvas already had an old painting under it so lots of interest and texture.  I primarily used a palette knife.  The black is slanted green and brown and highlighted with teal and blue, a reflection of the blue head and also a nice compliment to the red waddle.


A black and white cow... or is it?

Unfortunately this painting created a lot of reflection in my photograph of it but it is full of fun colors.


Wool is a little different because we can not blend colors with a palette knife.  To some degree we can blend and layer but it requires a slightly different aproach.  With wool, I do use black as an under-layer for dark areas of my felted painting as well as very black subject matter.  The underlayer helps to establish that the area will be dark.  As a top layer, black makes my darkest darks and I can hightlight with teal or purple from there. 

I do not have very many wool paintings with which to illustrate these ideas, but I sure look forward to making them!

-

The white underbelly of this hummingbird is in shadow and created with soft lilac and tans.


Let your colors be less literal.  Let the paint or wool speak its language.


Of course there are always exceptions to the rules!